


Available File Formats
U01 | DST | EXP | JEF | PEC | PES | VP3
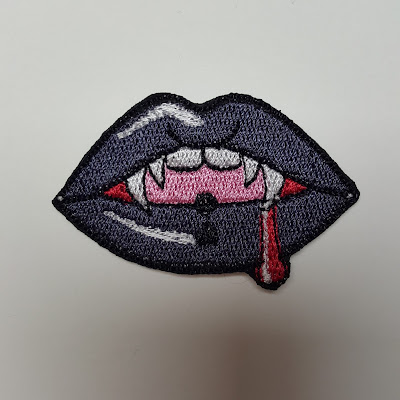
Design Size: Approx. 2×1.25″
I use polyester felt, iron-on tearaway stabilizer, 40wt top polyester threads, 90wt bobbin thread, and a 75/11 needle on my Brother SE600 for my embroidered previews.
Download the machine embroidery files for this design from my Google Drive
PLEASE NOTE THAT THIS IS AN OLDER FILE, I PLAN ON MAKING AN UPDATE SOMETIME IN THE FUTURE. The jump stitches are not exactly desirable, and looking back on it I should have made the white highlights satin stitches. This is a really old file, and was made back when I first started digitizing.
(Click below to expand the instructions)
Patch Making Instructions
1. Prepare your fabric using your preferred method of stabilizer.
2. Hoop the felt with the stabilizer, or use your preferred method of hooping.
3. Embroider the design.
4. Remove the design & felt from the hoop and peel or cut off the excess stabilizer.
Iron-On Method
6A. Iron an iron-on adhesive to the back of your embroidered patch, following the manufacturer’s instructions. I use Heat n Bond Ultrahold. If sewing on after ironing, use a product like Heat n Bond Lite.
7A. Cut out the patch with the backing paper of the iron-on adhesive still on the patch. It is up to you if you would like to cut close to the satin stitching, or if you would like to leave a little bit of the felt on the edges. If sewing on after ironing, I would recommend leaving a little bit of the felt on the edges.
Sew On Method
6B. Cut out the patch, leaving some felt on the edges to be able to nicely sew your patch down after finishing.
Tips & Tricks
Due to the software I use to do my digitization (Inkscape with the Inkstitch plugin), the colors listed on the PDF file and on your machine and/or software may not be accurate, and you may not have the thread numbers listed or the brand. I use Brother’s colors as a loose guide on the PDF, but really I use New Brothread threads and a few other “off-brand” threads – use the colors that you like to stitch out your design.
Use embroidery scissors to help you cut out your patch. Go slow and steady until you are comfortable with cutting faster. If you cut into the satin stitching, use a product such as Fray Check on the stitching.
If you are cutting close to the satin stitching as shown on my preview image, you can use a lighter or a butane torch on a low flame to help melt and hide the felt inside of the satin edge AFTER removing the iron-on adhesive backing paper. Do not hold the lighter or butane torch in the same spot for too long, polyester felt is a by-product of oil and is flammable, and it can also melt and drip on the skin causing burns. If you are using polyester threads, this is also a good way to hide any trimmed jump stitches that might be sticking out. For trimming jump stitches, snip very close to one point of the jump, and grab the thread with tweezers, then snip very close to the other side of the jump while pulling the thread taut.
Happy Embroidering!
It should be noted that, as with all of my patterns, I do not approve of commercial use of the pattern; please do not sell my patterns or variations/edits of my patterns.
It is okay to use my patterns to create physical objects and sell them, though!
I am not responsible for any harm that may result to you or your equipment if you follow my instructions or use my files. Please use common sense and don’t do anything dangerous, and watch your machine as it embroiders any first-time files.

